Showing posts with label PowerShell. Show all posts

June 11, 2017

HFM Data Audit (part 2)

In the previous post I detailed the mechanics of enabling and exporting data audits in HFM.  But what can you do with data once it's exported?

One option is to keep those .csv files for an arbitrary period of time.  If an issue arises you could search all those files for data of interest.  But you need some utility to search many files for text of interest and you could run into space issues which would require deleting deleting old data.

I prefer to import the data into a SQL database.  The data can be kept as long as needed and is easier to search.

With SQL server we can use the bcp utility to import the .csv files into a database table.  The table should match the fields we get in the .csv file.  The following is a sample create table statement to match the .csv file format.

CREATE TABLE [dbo].[AuditRecords](
[UserName]   [nvarchar](32) NULL,
[Activity]   [nvarchar](16) NULL,
[Timestamp]  [datetime] NULL,
[ServerName] [nvarchar](8) NULL,
[Scenario]   [nvarchar](16) NULL,
[Year]       [smallint] NULL,
[Period]     [nvarchar](3)  NULL,
[Entity]     [nvarchar](32) NULL,
[Value]      [nvarchar](16) NULL,
[Account]    [nvarchar](40) NULL,
[ICP]        [nvarchar](24) NULL,
[Custom1]    [nvarchar](32) NULL,
[Custom2]    [nvarchar](24) NULL,
[Custom3]    [nvarchar](8)  NULL,
[Custom4]    [nvarchar](32) NULL,
[DataValue]  [nvarchar](24) NULL
)

Now that we have a table to hold our data we need to import it.  The bcp utility uses an import format file to specify how to parse fields in the file being imported.  The specifications for the format file are kind of klunky which you can read about here.  But this is the format file I use:

10.0
16
1   SQLCHAR   0   64      ";"      1     UserName           SQL_Latin1_General_CP1_CI_AS
2   SQLCHAR   0   32      ";"      2     Activity           SQL_Latin1_General_CP1_CI_AS
3   SQLCHAR   0   24      ";"      3     Timestamp          ""
4   SQLCHAR   0   16      ";"      4     ServerName         SQL_Latin1_General_CP1_CI_AS
5   SQLCHAR   0   32      ";"      5     Scenario           SQL_Latin1_General_CP1_CI_AS
6   SQLCHAR   0   7       ";"      6     Year               ""
7   SQLCHAR   0   6       ";"      7     Period             SQL_Latin1_General_CP1_CI_AS
8   SQLCHAR   0   64      ";"      9     Entity             SQL_Latin1_General_CP1_CI_AS
9   SQLCHAR   0   32      ";"      10    Value              SQL_Latin1_General_CP1_CI_AS
10  SQLCHAR   0   80      ";"      11    Account            SQL_Latin1_General_CP1_CI_AS
11  SQLCHAR   0   48      ";"      12    ICP                SQL_Latin1_General_CP1_CI_AS
12  SQLCHAR   0   64      ";"      13    Custom1            SQL_Latin1_General_CP1_CI_AS
13  SQLCHAR   0   48      ";"      14    Custom2            SQL_Latin1_General_CP1_CI_AS
14  SQLCHAR   0   16      ";"      15    Custom3            SQL_Latin1_General_CP1_CI_AS
15  SQLCHAR   0   64      ";"      16    Custom4            SQL_Latin1_General_CP1_CI_AS
16  SQLCHAR   0   48      "\r\n"   17    DataValue          SQL_Latin1_General_CP1_CI_AS

Now we have a place to store our audit data and a way to import it.  The last step is to automate the whole process.  I run a PowerShell script daily that uses the AuditExport_cmd.exe to export yesterday's audit data to a .csv, and then import it into the database.  I also retain the .csv files in case something goes haywire with the bcp import.  I organize these retention folders by month and year in a parent folder named D:\LogArchives and periodically purge old retention folders.

The files created by the AuditExport utility have a maximum size of 17 Mb which may create more than one file per export.  The script needs the ability to import multiple files in a single batch.  The full script will export the data to a holding area, create a folder for retention if needed, then loop through the files in the holding area, import each with bcp into the database, then move file to the retaining folder.

One issue I ran into is that the data exported is in unicode format but bcp requires ASCII.  Also bcp runs on the SQL server.  I resolved this by importing the .csv file using Get-Content then exporting it using Out-File with the ASCII -encoding switch.  Since I have to run bcp on the SQL server the Out-File target is a share on the SQL server.  That share also has the bcp format file and a batch file to run the import.  This resolves the file format issue and keeps everything tidy on the SQL server.

The batch file on the SQL server is:

bcp DataAuditArchive.dbo.AuditRecords in T:\DataAudit\TempDataAudit.csv -U DataAudit_update -P Password123 -F 2 -f T:\DataAudit\DataAudit.fmt -e T:\DataAudit\DataAudit.err

Here my database is named DataAuditArchive and the table is AuditRecords.  The batch file, bcp format file, error file, and temporary copy of the .csv being imported are all in the T:\DataAudit folder.  This one line batch file gets called from a PowerShell script that runs on the HFM server.

I also want to save all of the output in case something goes wrong.  I do this by piping all of the results to a log file that gets saved in the monthly archive folder.  This gives an audit trail for the script file processing to allow troubleshooting.  If I find that one or more of the .csv files did not import I can import those manually from the retaining folder to ensure a complete audit record.

In the PowerShell script below the $Folder variable holds the name of the current months retaining folder which will house all of the .csv files for the month as well as the log file.  The $Working folder houses the initial export from the AuditExport utility.  The $BCPWorking folder is the share on the SQL Server that has the batch file, bcp import format, and the ASCII version of the .csv file currently being processed.

# Powershell script to archive and truncate data audit logs ending yesterday.
#

$Utility = 'D:\Oracle\Middleware\EPMSystem11R1\products\FinancialManagement\Utilities\HFMAuditExtractCmdLine_x64.exe'
$AppName = 'COMMA' # Name of the HFM Application
$Parms = ' -u D:\HFM.udl -a '+$AppName+' '  # UDL file and application name
$Data = ' -r '                              # flag to extract and truncate the data audit logs
#$Data = ' -x '                             # flag to extract and truncate the data audit logs
$Logs = 'D:\LogArchives\'                   # Parent folder for the log files
$TempFolder = 'Daily' # Store the dump from the HFMAuditExtract utility here
$BcpWorking = '\\SqlSvr\DataAudit'          # local folder on SQL server for BCP to use for import
$Start = ' -s 1/1/2013'                     # Arbitrary start date to make sure we get all previous data

$D = get-date

# New folder for each month that is named with the year and month
#
$Folder = $D.ToString('yyyy')+"_"+$D.ToString('MM')+$D.ToString('MMM')

# Capture everything through yesterday
#
$D = $D.AddDays(-1)
$End = ' -e '+$D.ToString('MM')+'/'+$D.ToString('dd')+'/'+$D.ToString('yyyy')

$Target = $Logs+$Folder                              # Destination for the logs
if (-not (test-path $Target)) { MkDir $Target }      # Create the destination folder if needed
$Working = $Logs+$TempFolder
$Output = ' -d '+$Working                            # Add the -d so this can be used as a parameter for the utility.

# Extract and truncate the task log
#   NOTE: the truncate task for data also does an extract
#
$CMD=$Utility+$Output+$Start+$End+$Parms+$Data       # Create the string to execute.  Path of utility and all parameters
echo $CMD                                            # Echo so we know what we did
invoke-expression $CMD                               # Execute the AuditExtract command line

# Process the file(s) that were created in the TempFolder
#
$TempFile = $BCPWorking + "\TempDataAudit_$AppName.csv"
$ScriptLog = $Target + '\BcpImport.log'
$BatchName = "T:\DataAudit\Import$AppName.cmd"

$AuditLogs = get-childitem $Working -filter "Data*$AppName*.csv"
foreach ($Log in $AuditLogs) {
    echo $Log.FullName

# Export the file be ANSI encoding because bcp has trouble with format files and unicode data files
#
    get-content $Log.FullName | out-file $TempFile -encoding ASCII

#   Run bcp to import the data
#
  $BcpResults = invoke-command -computername SqlSrv -scriptblock { Param($Bat) & cmd.exe /C $Bat } -ArgumentList $BatchName

# Move the file dated archive folder
#
  $MoveResults = Move-Item $Log.FullName $Target -passthru

# Delete the ASCII file we just imported
#
  if (test-path $TempFile) { del $TempFile }

# And save the results to the script log
#
  (' * * * ') | out-file $ScriptLog -append
  $Log.FullName | out-file $ScriptLog -append
  (' ') | out-file $ScriptLog -append
  $BcpResults | out-file $ScriptLog -append
  (' ') | out-file $ScriptLog -append
  $MoveResults | out-file $ScriptLog -append
}

This script is scheduled to run daily which keeps the DataAudit table in the HFM database lean and efficient.  The audit table becomes our source of truth unless the event happened today in which case we use the Data Audit tab in Workspace.

May 23, 2016

Auditing Financial Reports

You know how it goes.  Somebody starts a project and then forgets about it.  Or there are multiple versions of a report that were made for various purposes.  Or a report was critical at one point but eventually interest waned and is now unused.  Whatever the cause you wind up with a bunch of reports, books, and batches that are never used.  But you can't tell which ones aren't used if you don't have an audit trail.

There other uses for an audit trail beyond finding which reports are used.  Maybe you need to know who runs the reports, or how frequently reports are generated, or if reports are run at a certain times so you can plan maintenance.  Or maybe you're just curious.


Oracle docs 1353965.1 and 1947774.1 show the FRLogging.log file holds the audit data of Financial Reporting objects.  The FRLogging.log contains a bunch of information including start and stop times for reports and books, steps taken to produce output, queries used to pull from the data source, and other details.

The Problem

As noted in the 1947774.1 document you configure logging in the  MIDDLEWARE_HOME/user_projects/domains/EPM_System/config/fmwconfig/servers/FinancialReporting0/logging.xml file.  By default BI+ limits the log file size to 1Mb.  When the log reaches that limit the FRLogging.log file is renamed by appending a sequential number to the file name and a new log file is created.  By default only 50Mb of log files are retained.

This is good news because BI+ won't create an infinite number of logs which could fill your drive and crash your system.  But this is bad news because you can blow through 50Mb of logging in an afternoon of running multiple report batches during month end close, thus losing historical data.

Also the logs contain a lot of information that isn't interesting from an audit stand point.  We just want lines that show the name of the report as well as the time it ran and the user who ran it.

We have to parse the FRLogging logs to get just the summary information.  But we can't process the FRLogging.log file directly because it is held open by the Financial Reporting services and new records are constantly being appended.

The Solution

Windows has a .NET class called FileSystemWatcher.  This will monitor a file or folder and take action when file system events occur such as creating, deleting, or renaming a file.  We can use this feature to monitor the FRLogging.log file.  When it gets renamed we find the newest numbered file in the folder and process that.  This allows us to process a file that is not in use and prevents us from processing a log file more than once.

There are several lines in the FRLogging.log that are useful for audits.  The START: record gets added when the job starts and the JOB: record gives a completion summary of the job including the total time it took the job to complete.  In between these are one or more REPORT: records.  If you run just the report you get one REPORT: record but for a book or batch you will get multiple records, one for each report generated.


Each of those lines contain the string "start:" (note the colon in the string).  For the JOB: and REPORT: records this string identifies the start time of the event while for the START: records the string is the record identifier.  No other records contain this string so this is a sure way to parse the log for the audit data.

To put this all together we need a script that will run FileSystemWatcher, wait for the FRLogging.log file to get renamed, find the latest numbered file, do a case-insensitive search for lines with the string "start:", and drop those lines into a file we can retain for as long as we need.  This PowerShell script accomplishes those tasks:

# PoSh script to keep a record of all report usage
#   Use the FileSystemWatcher to monitor the FRLogging.log.  When the file gets renamed
#  we pull the job information from the most recent file and save it to an audit log
#
$Folder = `
"D:\Oracle\Middleware\user_projects\domains\EPMSystem\servers\FinancialReporting0\logs"
$File   = "FRLogging.log" # File to monitor with FileSystemWatcher
$Filter = "FRLogging*.log" # Filter to find the most recently renamed file
$Output = "D:\FRAudit.log" # Running audit trail

# Configure the FileSystemWatcher.  Create the watcher object, then define the
# folder and file to watch
#
$watcher        = New-Object System.IO.FileSystemWatcher
$watcher.Path   = $Folder
$watcher.Filter = $File

# Define the action to take when the file we are watching gets renamed
#
$renamed = Register-ObjectEvent $watcher "Renamed" -Action {

  # Get the FullName of the most recent numbered FRLogging*.log file
  $LogFile = (Get-ChildItem $Folder $Filter | Sort LastWriteTime -desc)[1].FullName

  # Do a case insensitive search for all lines that contain the string "start:"
  $NewRecs = get-content $LogFile | where {$_ -match "start:"}

  # And append those lines to our running audit trail
  $NewRecs | out-file $Output -append
}

If you use this script you will need to change the value for the $Folder variable to match your environment.  The value of the $Output variable is arbitrary but must be the full path to a file for your running audit trail.  The tricky part of the script is the line where we find the most recent log file.  Get-ChildItem returns an array of files matching the filter in the folder.  We sort that array by LastWriteTime in reverse order and take the second element of the array (index [1]) to get the latest numbered file since the first element (array index [0]) is the FRLogging.log file.

But how do we make sure the script stays running to continuously monitor the FRLogging.log file?

An easy solution is to use Windows Task Scheduler to create a task that runs at system startup.  You can also start the task manually when you first create it or if you adjust it later.  Since there is nothing to terminate the script the task keeps running in the background.  We basically get a service that starts automatically at every reboot.


Our new audit log is just a raw dump of the the useful lines from the FRLogging.log file.  You will still need to parse that data to isolate the information of interest to you.  (I have another PowerShell script to do that and will send it to you if you are interested.)  But the key point is that we can leverage the transient information Oracle gives us and generate a persistent audit trail.  And we can do it for free using built-in tools and with minimal overhead.

March 24, 2016

Automating HFM form updates

We have lots of different forms in our HFM applications.  Many of these are used for reporting and analysis on various aspects of the income statement, balance sheet, and cash flow statements.  We also have a variety of supplemental forms for tax, human resources, and other business purposes.

http://xkcd.com/1566/

For these forms the year on the point of view should be the current fiscal year.  Although this can be adjusted by the users it is more convenient if the default POV is the current year.

We have over 100 such forms.  After we complete year-end close and roll forward to the next fiscal year all of these forms need to be adjusted to update the default POV for the new year.  It is a tedious task to do this by hand.

Strategy

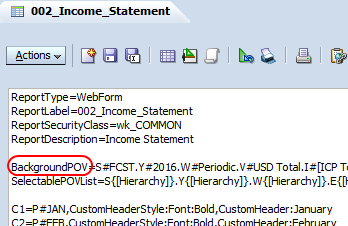
There is a graphical interface for designing and editing forms.  This gives a friendly way of representing the script that is used to define the dimensions, members, and format of the form.  From the editor there is a button on the Actions bar that lets you edit the script directly.


Notice the line that starts with BackgroundPOV=.  This defines the default POV for the form.  So while one option is to use the GUI tools to update the POV, it is often quicker to edit the script and save the update.


Because the form is defined in a script, the script is what gets saved when we do LCM exports.  The relative path is ..\resource\Forms\Web Forms\.  Beneath that are the folders and forms as defined in workspace.  Each form is saved in an .xml file, but the content of the .xml file is primarily the script that we see in workspace.


Our strategy is to export the forms, edit the .xml files to update the year in the BackgroundPOV, then use LCM import the updated forms.

Solution

The key is generating a script to automate the change.  Powershell makes it easy to traverse a folder and subfolders for documents.  In this case the filter is easy because the forms all reside beneath a single parent folder and are all defined in .xml files.

We open each file in turn and look for the BackgroundPOV line.  The POV is defined using the standard HFM scripting style of <dimension>#<value> with periods separating the dimension definitions.  So we search for the string .Y# then use a simple substring to find the year value and replace it with the new value.

The sample script is:

# PoSh script to update POV in the web forms in HFM application with the new year
#    We use the LCM export of the forms for the application.  The exports include the
#    report script in the .xml files.  We search for the BackgroundPOV line and replace
#    the Y# value with the new year.
#
#    I'm assuming that the current year is correct and so we increment the year.
#    We could use a similar techinique and replace the year with a static value
#

# All of the folders that have the web data forms that have to be updated
[array]$Dirs = #Folder 1, `
            #Folder 2, `
               # ...      `
            #Last folder

foreach ($D in $Dirs) {

    # Get all of the .xml files in the current web form folder
    #
    $Files = Get-ChildItem -path $D -filter '*.xml'
 
    foreach ($FN in $Files) {
        $FN

        # Read and loop through the .xml file
        #
        $Script = Get-Content $FN.FullName
        for ($i=0; $i -le $Script.Length; $i++) {

            # Found the line we need to change
            #
            if ($Script[$i] -match 'BackgroundPOV') {
                $L = $Script[$i]

                # Get the 4 digit year.  POV is standard nomencalture so search for .Y#
                #
                $Year = $L.Substring($L.IndexOf('.Y#')+3,4)

                # Increment the year.  Note we convert to integer then back to string
                #
                [string]$New = [int]$Year + 1

                # Replace the year in the script line
                #
                $Script[$i] = $L.Replace($Year,$New)

                # There is only one line per file so exit the for loop
                #
                $i = $Script.length
            }
        }

        # Overwrite the old file with the new
        #
        $Script | out-file $FN.FullName
    }
}

Here are some things to note about the script.  I force the list of folders into an array even if I need just one folder; this gives the script flexibility to use any number of folders.  I hard code the path for the forms but that could be replaced with a prompt or command line parameter.  I assume that the current year in the form is correct and increment the value, but you can replace that with a static string if you need to updated forms with a specific value.  Also, I did not use the -Recurse option in the Get-ChildItem commandlet, but this can be used to traverse all subfolders in the -Path to process all of the .xml files in all directories.  And it is good to have a backup, so before you run the script either do two LCM exports or work from a copy so you can return to a known good state if things go belly up.

I assume you know how to export and import using LCM so I don't describe that process.  My goal is detailing the strategy for doing the mass update and showing the sample script that you can customize for your needs.  The text files generated by LCM lend themselves to scripting techniques like this if you have similar issues with other products.  And while I'm personally a fan of PowerShell for scripted solutions, there are other scripting tools available if your comforts lie elsewhere.

December 18, 2015

Moving Maps

Financial Data Quality Management (FDQM, formerly FDM, formerly Upstream, currently FDMEE) is our primary tool for moving data from our general ledger systems into HFM for consolidation and reporting.  Part of the power of FDQM is that it can translate identifiers for accounts, business units, and other dimensions from the source systems so they match your HFM metadata.  This is accomplished through mapping tables.  FDQM structures locations into a logical hierarchy and associates a map and input format with each location (internally called partitions).  If each location has a different GL then you could potentially have a unique map per location but in most instances locations that use the same GL will use the same map.

http://www.xkcd.com/1500/

What if you need to migrate the mapping tables from one system to another, say from production to development?  With the FDQM user console you can export the maps to Excel and then upload them into the target environment.  But you have to do this one dimension at a time for each location.  If you have dozens of locations and many custom dimensions this is tedious and time consuming.

From the FDQM WorkBench you can export everything about your FDQM application to an .xml file.  This can include custom scripts and reports as well as standard items like locations and import formats.  When you select Locations it will select everything associated with the locations such users and privileges.  You must click the Options tab and select Export maps with locations to include the mapping tables in the export.


Exporting locations is mostly an all or nothing affair.  You can choose to not export User Privileges, but if you deselect any other item then Locations is automatically deselected which prevents you from exporting the maps.  From the FDQM perspective this makes sense since you might get an incomplete description of the location which would result in errors on the target system.  But it also means you can't export just the maps.

Problem overview

Our situation is a company that spun off some business units to form a new company.  The HFM metadata was adjusted to remove the now unused entities and accounts.  The locations in FDQM were also updated and reorganized to reflect the new structure of the company without the business units that were spun off.

A test environment was created to facilitate validation of these changes and obtain user acceptance testing.  To accomplish this we needed to ensure the current maps from production were available to the testers.  The problem was that if we imported the locations using the Workbench export from production it would overwrite the updated structure leaving us with the original structure and the discarded locations.

So we needed a way to move just the maps from production to the test environment.

Can we use SQL?

FDQM uses SQL on the back end to hold all of the structural information and some logging.  The table structure isn't well documented and not entirely obvious.  The maps are held in one of the tDataMapSeg tables.


There are 50 tDataMapSeg tables and no documentation to define which table to use.  Notice that tDataMapSeg table includes the fields DataKey, ParitionKey, and CatKey.  These are primary keys into other tables.  So not only would we need complex queries to use SQL to copy the data between environments, we potentially introduce unexpected and unsupportable errors if we tinker with key fields.

Can we use the XML?

The export produced by WorkBench is a well structured .xml file.  There is a section for each item and the members of that item are enumerated within the XML tree along with their properties and values.


In this example the userInfo element defines the users and their attributes and the userPrivileges element defines which partitions (locations) the user can access

The problem with the maps is that they are defined as base64 encoded strings.  While this allows the binary map table to be exported to text there isn't an easy way to parse the maps.


Can we copy the encoded strings?

PowerShell version 3 and later has powerful tools for reading and manipulating XML files.  We can easily traverse the XML tree, access specific attributes and values, and adjust those attributes and values.  (You can actually do a whole lot more but for this situation that is all we need to do.)

If you are unfamiliar with PowerShell there are many excellent resources available on the interwebs for every level of expertise.  My other blog, 2scriptornot2.blogspot.com, has lots of sample code and links to some good resources.

So our strategy is:
  1. Export the locations from the production and test environments to .xml
  2. Iterate through the locations in the test .xml
  3. Find the matching location in production .xml
  4. Copy the encoded string for the mapping table from production to test
  5. Save the test .xml and import it with WorkBench to update the maps
One wrinkle I ran into is that the map for a location may be broken into several sections and the number of sections didn't always match between the environments.  I added a test for that in the code and skip those locations but note in the output that the location was skipped.  For those locations we exported the dimensions manually from the FDQM console and copied them over.  This only happened for a couple locations so was a reasonable work around.

The commented code is:

# Powershell script to copy just the mapping tables from Source to Target
#    for only the locations that are in Target
#

# Read the .xml files
#
echo 'Reading Source'
[xml]$Source = get-content 'Source.xml'
echo 'Reading Target'
[xml]$Target  = get-content 'Target.xml'

# Process only the Target locations
#
foreach ($L in $Target.weblinkconfiguration.Locations.povPartitions.povPartition) {
    echo $L.PartName

    # Get the matching povPartition from the Source tree
    #
    $SourcePart = $Source.weblinkConfiguration.Locations.povPartitions.povPartition | `
          where {$_.partName -eq $L.partName}

    # There may be more than one map per partition.
    #  Force these to be arrays so we can loop through them
    #
    [array]$SourceMaps = $SourcePart.Maps
    [array]$TargetMaps  = $L.Maps

    # Make sure the counts match.  If not we will migrate those mapping tables manually
    #
    if ($Sourcemaps.count -eq $TargetMaps.Count) {
        for ($i=0; $i -lt $TargetMaps.count; $i++) {

    # The actual mapping table is a base64 blob in the innerText of povPartition node.
    #   Copy that from Source to Target
    #
            $TargetMaps[$i].innerText = $SourceMaps[$i].innerText
        }
    } else {
        echo ("*** " + $L.PartName + "Map counts don't match : Source="+ `
              $SourceMaps.count + " , Target=" + $TargetMaps.count)
    }
}

# Save the results
#
echo 'Saving update'
$Target.Save('NewTarget.xml')

If you use this code replace the Source.xml, Target.xml, and NewTarget.xml with the full path to your export files.

Some things to note are that I can reference a specific element by listing each limb of the tree separated by a periods.  So I can use one line to drill down to the .povPartition element to access the Maps element.  (I include that tree path in the previous screenshot for a visual reference.)  I also use PowerShell typecasting to force the maps into an array even if there is just one element which allows for simpler coding.

By using a script we can repeat the process consistently and reliably over the course of several rounds of testing.  And the whole process from exporting, to copy, to importing can be completed in a few minutes.